Booting into our kernel
In the last post, we managed to create a rust binary that is independent of any OS dependencies
We now need to figure out how we will take that binary and convert it to a bootable disk image.
What happens when a computer turns on?
When a computer powers on, it does not know what an executable is.
All it knows is the following:
- Which device it needs to use for booting.
- A fixed location that it is supposed to read from (in that device)
The CPU itself has its instruction pointer set to a hardwired address called the reset vector.
The Intel® 64 and IA-32 Architectures Software Developer’s Manual states (on Page 3455):
📚 First instruction Executed (Volume 3A. Section 11.1.4)
The first instruction that is fetched and executed following a hardware reset is located at physical address
0xFFFFFFF0H.This address is 16 bytes below the processor’s uppermost physical address.
The EPROM containing the software-initialization code must be located at this address.
That’s a lot of jibber jabber but all we need to focus on right now is that the CPU starts execution at that address.
The motherboard has a fixed set of instructions present at that address called the motherboard firmware.
What does the motherboard firmware do?
That firmware first makes sure that there isn’t anything in your computer that can blow up, using a process called the Power-On-Self-Test (or POST for short). Then it initializes a bunch of stuff in your computer such as RAM, hardware devices, PCIe devices and after all that, it figures out which of the disks can be used to boot i.e are “bootable”.
After this, a firmware be either one of two kinds.
- The legacy BIOS kind
- The modern UEFI kind
Modern systems usually ship with UEFI support only, along with a separate “Compatibility Support Module” (CSM) that allows the firmware to pretend to be a legacy BIOS based firmware.
We’ll first talk about legacy BIOS and then talk about UEFI.
In case of BIOS, when all the startup routines are done, the firmware goes to the selected bootable disk and loads a single sector from LBA-0 into RAM at address 0x7c00
Sidebar: Address vs LBA
In order to refer to a location in memory, we usually use the term “address” however, in order to refer to a location on a disk, we use the term “Logical Block Address” (LBA).
The LBA is a number that represents the sector number/index on the disk. For example,
LBA-0refers to the first sector on the disk.
Circling back now.
That sector we have read has a special name. It is called the Master Boot Record and it is exactly 512 bytes (Disks are usually divided into 512 byte sectors)
The Master boot record (MBR) is laid out like this:
- Section A (446 bytes) contains the bootloader code
- Section B (64 bytes) contains a partition table
- Section C (2 bytes) contains an identifier

The firmware first checks if the 16 bit value present at last 2 bytes of the MBR is equal to 0x55aa
(at address 0x7c00 + 0x1fe i.e 0x7dfe and 0x7c00 + 0x1ff i.e 0x7dff.
0x55aa is a magic number that basically tells the BIOS that the sector is a valid boot sector
Then, it jumps back to the start (to address 0x7c00, i.e the “Section A” in Figure 3.A) where our bootloader code can start executing
Alright, that was a *LOT* of information. So let’s take a breather and recap what we’ve learned so far. Here’s what happens when you press the power button on your computer:
- CPU instruction pointer reset to
0xFFFFFFF0H - Motherboard contains fixed instructions at that address (firmware)
- Control is handed over to the firmware
Then, the firmware does the following:
- Perform the Power-On-Self-Test
- Initialize a bunch of stuff like, RAM, PCIe devices, disks etc
- In case we’re using BIOS firmware, it reads 512 bytes from disk at
LBA-0and loads them into memory at0x7c00 - Checks if the last 2 bytes of that sector are equal to
0x55aa - If yes, then jump back to the start at address
0x7c00 - Start executing code there.
Cool.
Now we can finally start writing some actual code! and run our operating system (at least some semblance of an operating system).
A bootloader
We’ll start with a basic bootloader of our own to at least see **some** output on our screen. Then, we’ll move to a more concrete and permanent bootloader in a bit.
However, we won’t be rolling our own bootloader just yet and follow Linux’s lead to use a battle tested bootloader instead otherwise, it’ll distract us from our main goal of writing an OS without providing any meaningful insight besides “This is how the manufacturers set things up, so write this magic number to this address, write these instructions verbatim” etc.
Our basic bootloader will be written in Assembly so, you’ll need an assembler to assemble our code.
I’m using nasm, which uses the Intel Syntax, so if you’re using some other assembler which uses another syntax (e.g AT&T Syntax), you need to make changes to your code accordingly).
Why assembly? Because C/Rust etc only emit protected mode binaries, and when we boot, we will be in real mode which means, we can’t use rust code there.
This is one of the things that these languages simply can’t do.
If you’re not too familiar with Assembly, that’s fine. We won’t be using it too extensively throughout this series. And whenever we *do* use it, I’ll be sure to explain every bit of it, so we’re all on the same page.
We also need an emulator to actually run it (I’m using qemu-system-x86-64). We will pass our compiled binary to it and it’ll treat it as a disk image.
You can either copy this code as is, or head on over to this post 👉 Minimal MBR in Assembly for more details
 1[org 0x7c00]
 2
 3bits 16
 4
 5FOREGROUND equ 0x2 ; Green
 6BACKGROUND equ 0x0 ; Black
 7
 8NORMALIZED_BACKGROUND equ (BACKGROUND << 4)
 9
10ATTRIBUTE equ FOREGROUND | NORMALIZED_BACKGROUND
11
12VGA_BUFFER_WIDTH equ 80
13VGA_BUFFER_HEIGHT equ 25
14
15CELL_COUNT equ VGA_BUFFER_WIDTH * VGA_BUFFER_HEIGHT
16
17.set_initial_memory_addresses:
18    mov ax, cs
19    mov ds, ax
20
21    mov ax, 0xb800
22    mov es, ax
23
24    xor di, di
25
26    cld
27
28.initialize_data_source:
29    mov si, message
30
31.setup_write_text:
32    mov cx, message_len
33    mov ah, ATTRIBUTE
34
35.perform_write_text:
36    lodsb
37    stosw
38    loop .perform_write_text
39
40.setup_clear:
41    mov cx, (CELL_COUNT - message_len)
42    mov al, ' '
43
44.perform_clear:
45    stosw
46    loop .perform_clear
47
48.hang:
49    hlt
50    jmp .hang
51
52message db "Hello world!"
53message_len equ $ - message
54
55times 510 - ($ - $$) db 0
56
57dw 0xAA55
Now assemble it with
1# Tell nasm to assemble it in a raw binary format
2nasm -f bin mbr.asm -o mbr.bin
And finally, run it using QEMU
1# We'll be using qemu to emulate a computer
2qemu-system-x86_64 mbr.bin
If all goes well, you should see the following screen
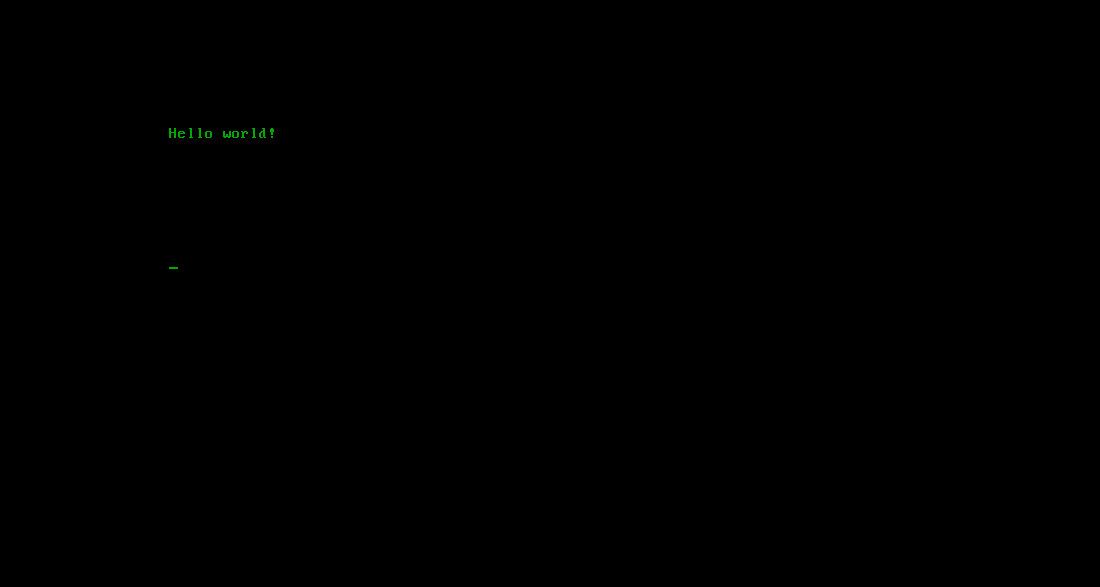
🎉 Woohooo!! Our first kernel code. *IT RUNS!*
It’s not much, but whatever it is, it is ours. We made it. From scratch (unless you’re one of the Carl Sagan followers 😉)
This is a huge step in the journey towards building our own operating system.
In the next post, we’ll move over to a much more battle tested bootloader instead of our primitive one and also try to integrate our rust code into it.
Our goal will be to use the bootloader to load our rust code and leave assembly behind so that we don’t have to constantly fiddle with registers, memory addresses, and instruction flow.